Tutorials
Berisi Informasi Berbagai Tutorial Untuk Kegiatan Manajemen Infrastrutktur IT
TOLONG JANGAN MELAMPIRKAN USERNAME DAN PASSWORD ASLI PADA CATATAN APAPUN!
Docker Container
Informasi Terkait Manajemen Container Menggunakan Docker
Cara Installasi Docker Engine Pada Linux Ubuntu
Dokumentasi Lengkap Data Dilihat Disini: Lihat
Sistem Operasi
Untuk Menginstall Docker Engine Kita Membutuhkan Versi 64-Bit Dari Sistem Operasi Dibawah ini:
- Ubuntu Noble 24.04 (LTS)
- Ubuntu Jammy 22.04 (LTS)
- Ubuntu Focal 20.04 (LTS)
Sebelum Menginstall Docker Engine, kita harus menghapus data docker yang ada sebelumny, untuk VM atau VPS yang baru tidak perlu di lakukan
jalankan command ini pada terminal
for pkg in docker.io docker-doc docker-compose docker-compose-v2 podman-docker containerd runc; do sudo apt-get remove $pkg; doneImage, Container, Network pada installasi docker sebelumnya mungkin masih ada dan tidak terhapus, untuk menghapus secara bersih Docker dapat mengikuti petunjuk pada dokumentasi resmi disini lihat
MENGINSTALL DOCKER
tambahkan apt repository
# Add Docker's official GPG key:
sudo apt-get update
sudo apt-get install ca-certificates curl
sudo install -m 0755 -d /etc/apt/keyrings
sudo curl -fsSL https://download.docker.com/linux/ubuntu/gpg -o /etc/apt/keyrings/docker.asc
sudo chmod a+r /etc/apt/keyrings/docker.asc

# Add the repository to Apt sources:
echo \
  "deb [arch=$(dpkg --print-architecture) signed-by=/etc/apt/keyrings/docker.asc] https://download.docker.com/linux/ubuntu \
  $(. /etc/os-release && echo "$VERSION_CODENAME") stable" | \
  sudo tee /etc/apt/sources.list.d/docker.list > /dev/null
sudo apt-get update
jika menggunakan distro seperti linux mint, kita bisa menggunakan UBUNTU_CODENAME selain VERSION_CODENAME
install docker package
Install Versi Terbaru
sudo apt-get install docker-ce docker-ce-cli containerd.io docker-buildx-plugin docker-compose-pluginInstall Versi Spesifik
Untuk Menginstall Versi Spesifik Dari Docker Engine, Terlebih Dahulu Cek Yang Tersedia Pada Repository
# List the available versions:
apt-cache madison docker-ce | awk '{ print $3 }'

5:27.1.1-1~ubuntu.24.04~noble
5:27.1.0-1~ubuntu.24.04~noble
...
Pilih Versi Yang Kita Inginkan
VERSION_STRING=5:27.1.1-1~ubuntu.24.04~noble
sudo apt-get install docker-ce=$VERSION_STRING docker-ce-cli=$VERSION_STRING containerd.io docker-buildx-plugin docker-compose-plugin
Mengecek Installasi Docker Berhasil Atau Tidak
jalankan perintah di bawah ini, terminal akan menampilkan tulisan hello world pada docker
sudo docker run hello-worlduntuk mengecek Container Pada Docker ketikan
docker ps -auntuk mengecek image yang sudah di pull atau di tarik
docker image ls
Web Server
- Cara Konfigurasi Web Server
- Cara Install Web Server
Installasi LAMP Stack (Apache - MySQL/MariaDB - PHP ) di Ubuntu
Step 1 – Update system
First, let’s update your system to ensure that you have the latest versions of software packages and security updates, while also avoiding any potential errors that may arise from outdated versions.
sudo apt update && sudo apt upgrade -yStep 2 – Install Apache ( Web server)
Run the following command to install the Web server with Apache:
sudo apt install apache2 -yAfter the installation, start and enable the Apache service to run with the system every time it restarts.
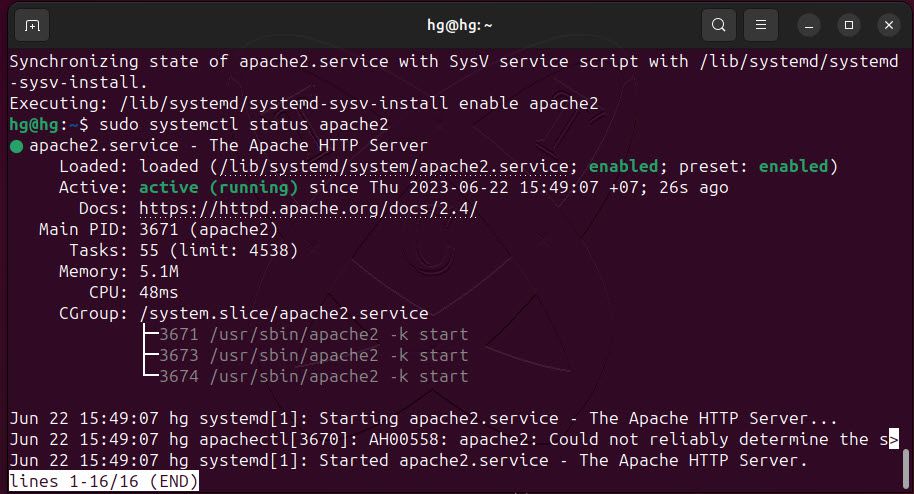
sudo systemctl start apache2sudo systemctl enable apache2Check the status of the Apache service and ensure that it is running:
sudo systemctl status apache2If successful, you will see its status as running as shown in the example below:
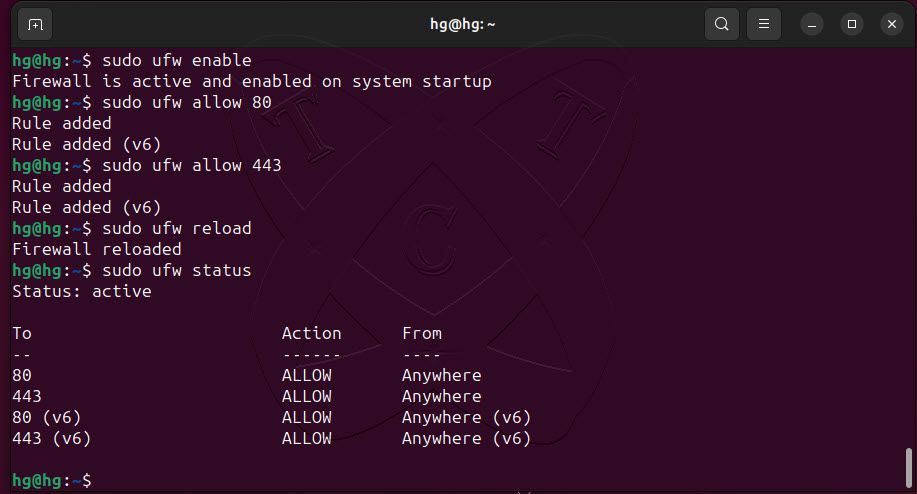
By default, the Apache service listens on ports 80 and 443 (Secure). We need to allow these two ports through the UFW firewall. (Skip this step if you are not using the UFW firewall.)
sudo ufw enablesudo ufw allow 80sudo ufw allow 443sudo ufw reloadsudo ufw statusOutput:
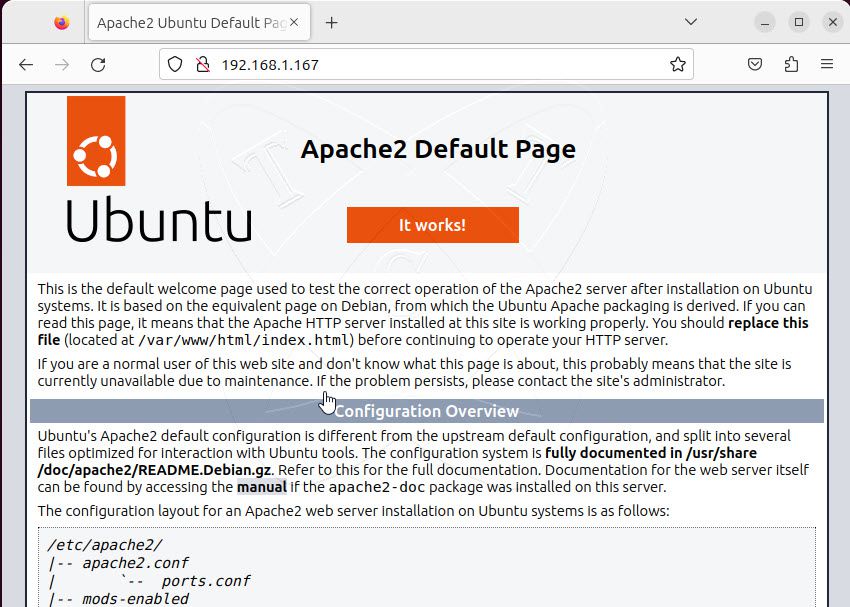
Finally, access the server address. If you see a similar page as shown below, it means that Apache has been successfully installed.
Step 2 – Install MySQL/MariaDB Database Server
Install MySQL/MariaDB
In this article, we will install MariaDB as the database server. MariaDB is an open-source database management system that is fully compatible with MySQL. To install it, run the following command:
sudo apt install mariadb-server -yAfter the installation, start and enable the MariaDB server to automatically start with the system reboot using the following command:
sudo systemctl start mariadbsudo systemctl enable mariadbCheck the status of the MariaDB server and ensure that it is running on the system, use the following command:
sudo systemctl status mariadb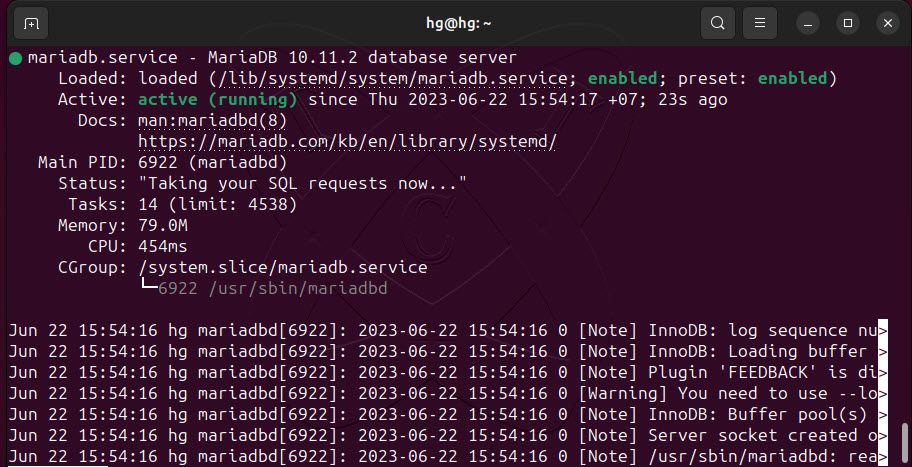
Secure MySQL/MariaDB
Next, let’s configure the security settings for your MySQL/MariaDB to ensure that it is properly set up and secure after the installation. Use the following command to initiate the security configuration:
sudo mysql_secure_installationTo configure the security settings for MySQL/MariaDB, please provide answers to the following questions:
sudo mysql_secure_installationNOTE: RUNNING ALL PARTS OF THIS SCRIPT IS RECOMMENDED FOR ALL MariaDB
SERVERS IN PRODUCTION USE! PLEASE READ EACH STEP CAREFULLY!In order to log into MariaDB to secure it, we'll need the current
password for the root user. If you've just installed MariaDB, and
haven't set the root password yet, you should just press enter here.Enter current password for root (enter foNOTE: RUNNING ALL PARTS OF THIS SCRIPT IS RECOMMENDED FOR ALL MariaDB
SERVERS IN PRODUCTION USE! PLEASE READ EACH STEP CAREFULLY!In order to log into MariaDB to secure it, we'll need the current
password for the root user. If you've just installed MariaDB, and
haven't set the root password yet, you should just press enter here.Enter current password for root (enter for none):
OK, successfully used password, moving on...Setting the root password or using the unix_socket ensures that nobody
can log into the MariaDB root user without the proper authorisation.You already have your root account protected, so you can safely answer 'n'.
Switch to unix_socket authentication [Y/n] N #Type N and hit Enter
... skipping.You already have your root account protected, so you can safely answer 'n'.
Change the root password? [Y/n] #Keep default and hit Enter
New password: # Enter password for root and hit Enter
Re-enter new password: # Re-password for root and hit Enter
Password updated successfully!
Reloading privilege tables..
... Success!
By default, a MariaDB installation has an anonymous user, allowing anyone
to log into MariaDB without having to have a user account created for
them. This is intended only for testing, and to make the installation
go a bit smoother. You should remove them before moving into a
production environment.Remove anonymous users? [Y/n] #Keep default and hit Enter
... Success!Normally, root should only be allowed to connect from 'localhost'. This
ensures that someone cannot guess at the root password from the network.Disallow root login remotely? [Y/n] #Keep default and hit Enter
... Success!By default, MariaDB comes with a database named 'test' that anyone can
access. This is also intended only for testing, and should be removed
before moving into a production environment.Remove test database and access to it? [Y/n] #Keep default and hit Enter
- Dropping test database...
... Success!
- Removing privileges on test database...
... Success!Reloading the privilege tables will ensure that all changes made so far
will take effect immediately.Reload privilege tables now? [Y/n] #Keep default and hit Enter
... Success!Cleaning up...
All done! If you've completed all of the above steps, your MariaDB
Thanks for using MariaDB!
installation should now be secure.r none):
OK, successfully used password, moving on...Setting the root password or using the unix_socket ensures that nobody
can log into the MariaDB root user without the proper authorisation.You already have your root account protected, so you can safely answer 'n'.
Switch to unix_socket authentication [Y/n] N #Type N and hit Enter
... skipping.You already have your root account protected, so you can safely answer 'n'.
Change the root password? [Y/n] #Keep default and hit Enter
New password: # Enter password for root and hit Enter
Re-enter new password: # Re-password for root and hit Enter
Password updated successfully!
Reloading privilege tables..
... Success!
By default, a MariaDB installation has an anonymous user, allowing anyone
to log into MariaDB without having to have a user account created for
them. This is intended only for testing, and to make the installation
go a bit smoother. You should remove them before moving into a
production environment.Remove anonymous users? [Y/n] #Keep default and hit Enter
... Success!Normally, root should only be allowed to connect from 'localhost'. This
ensures that someone cannot guess at the root password from the network.Disallow root login remotely? [Y/n] #Keep default and hit Enter
... Success!By default, MariaDB comes with a database named 'test' that anyone can
access. This is also intended only for testing, and should be removed
before moving into a production environment.Remove test database and access to it? [Y/n] #Keep default and hit Enter
- Dropping test database...
... Success!
- Removing privileges on test database...
... Success!Reloading the privilege tables will ensure that all changes made so far
will take effect immediately.Reload privilege tables now? [Y/n] #Keep default and hit Enter
... Success!Cleaning up...
All done! If you've completed all of the above steps, your MariaDB
installation should now be secure.Thanks for using MariaDB!
Now, please try logging into your MySQL/MariaDB using the root account and the password previously set with the following command:
sudo mysql -uroot -p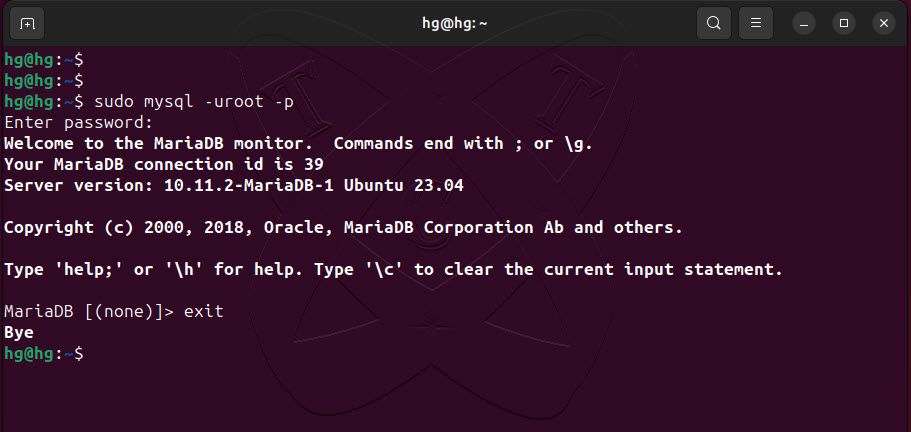
exit;Step 3 – Install PHP
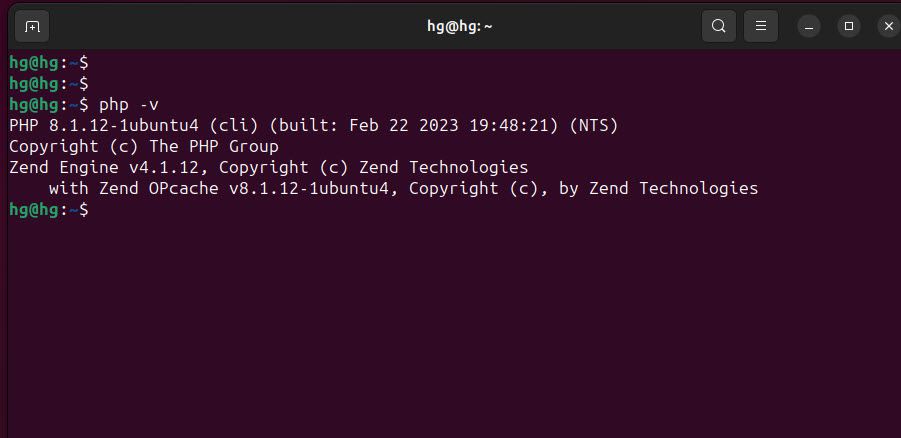
Next, we will install PHP and its extensions to make it compatible with Apache and MySQL/MariaDB using the following command:
sudo apt install php libapache2-mod-php php-mysql php-mbstring -yAfter installation, you can check the installed PHP version using the following command:
php -vIf you see information about the current PHP version, it means PHP has been installed successfully, and the necessary extensions have been activated.
Step 5: Test PHP Processing on Web Server
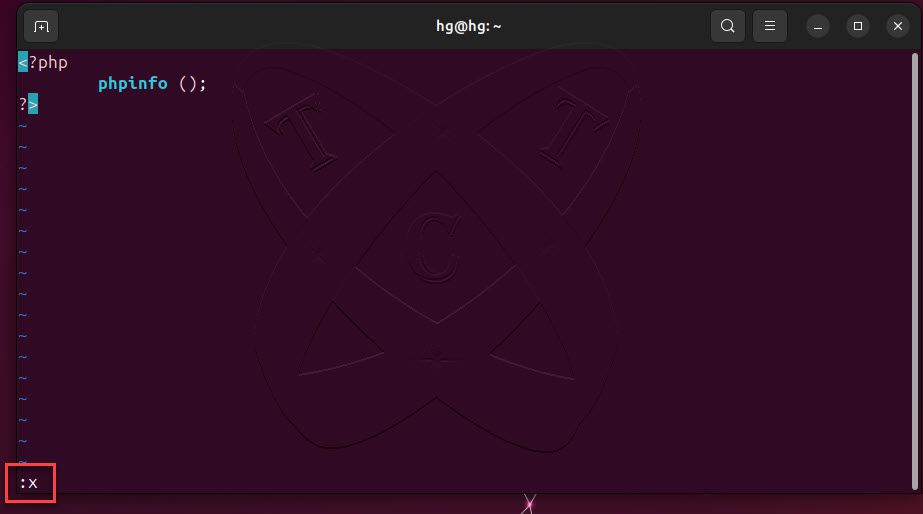
To test the new LAMP installation, create a basic PHP script and place it in the web root directory located at /var/www/html/, then check if the script is accessible via an internet browser. The steps below explain the procedure for performing this test.
Create a file in the web root directory by typing the following command:
sudo nano /var/www/html/info.phpAdd new content below:
<?php
	phpinfo ();
?>
After finishing, save and exit the file by pressing ctrl+o and enter ,and then ctrl+x and then enter
And restart Apache service to apply the changes:
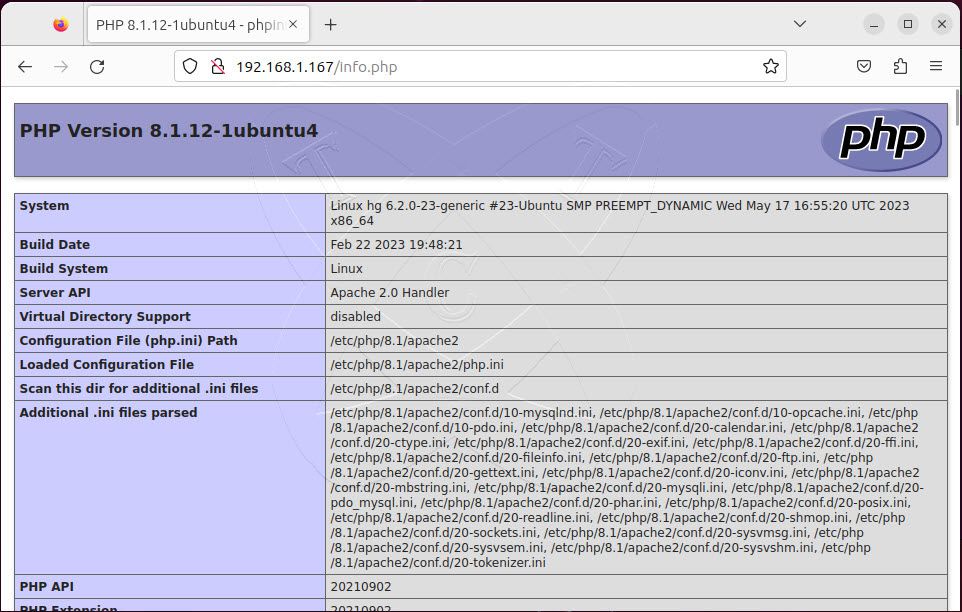
sudo systemctl restart apache2Now, access the address http://IP-Server/info.php .If you see a similar image as shown below, it means PHP is compatible with Apache.
Conclusion
That’s it! Through this How to Install and Configure the LAMP stack on Ubuntu 23 guide, you have successfully installed the LAMP stack on your server. If you have any comments or contributions, please feel free to leave them in the comments section below.
SSL/TLS Cloudflare
SSL Origin Server, *murungrayakab.go.id dan murungrayakab.go.id
Sertifikat ini akan berjalan jika pada settingan DNS cloudflare Proxy di centang (tanda awan berwarna oranye aktif)
Files:
Key Format: PEM
Origin Certificate
-----BEGIN CERTIFICATE-----
MIIEsjCCA5qgAwIBAgIUG0yGp8Np7/OWrSxC3UsPok75IocwDQYJKoZIhvcNAQEL
BQAwgYsxCzAJBgNVBAYTAlVTMRkwFwYDVQQKExBDbG91ZEZsYXJlLCBJbmMuMTQw
MgYDVQQLEytDbG91ZEZsYXJlIE9yaWdpbiBTU0wgQ2VydGlmaWNhdGUgQXV0aG9y
aXR5MRYwFAYDVQQHEw1TYW4gRnJhbmNpc2NvMRMwEQYDVQQIEwpDYWxpZm9ybmlh
MB4XDTI0MDgxODA1MzkwMFoXDTM5MDgxNTA1MzkwMFowYjEZMBcGA1UEChMQQ2xv
dWRGbGFyZSwgSW5jLjEdMBsGA1UECxMUQ2xvdWRGbGFyZSBPcmlnaW4gQ0ExJjAk
BgNVBAMTHUNsb3VkRmxhcmUgT3JpZ2luIENlcnRpZmljYXRlMIIBIjANBgkqhkiG
9w0BAQEFAAOCAQ8AMIIBCgKCAQEA8vpR4EW/hXMuWV9PI7voafd9l+nhsuz2Q5wg
26tj4ScSSiS0aoIRKJ9fiF6c+4di2Y2FGgwM/U/nFYOhFi/reUX91d5BqKUtYeNQ
oZlpNuHr3kvi9oEAG1jx6D9HsSQ7jXXUi+fnOPUq2q1wauRAPNVapWhFnj9nItKi
KJSV9wKq8LmQJiutQd77HP1wWDnuup3mv4oUSGxRBGw9lUaDfNw9BtW4lGi7O6+H
KJPFZBT69KTnLZV/7iiWP2HlSRNqgwpYeaX4U+z0a89GEVGvp1T7f3XXlVvnyB4c
LlJ6UoVp6Gx2lwQT08W7KYbOJsknC/dQQFZecFICWWxj+gMhXwIDAQABo4IBNDCC
ATAwDgYDVR0PAQH/BAQDAgWgMB0GA1UdJQQWMBQGCCsGAQUFBwMCBggrBgEFBQcD
ATAMBgNVHRMBAf8EAjAAMB0GA1UdDgQWBBQn0NNJQdp5pxx695CZGyPi7Nz3ZDAf
BgNVHSMEGDAWgBQk6FNXXXw0QIep65TbuuEWePwppDBABggrBgEFBQcBAQQ0MDIw
MAYIKwYBBQUHMAGGJGh0dHA6Ly9vY3NwLmNsb3VkZmxhcmUuY29tL29yaWdpbl9j
YTA1BgNVHREELjAsghUqLm11cnVuZ3JheWFrYWIuZ28uaWSCE211cnVuZ3JheWFr
YWIuZ28uaWQwOAYDVR0fBDEwLzAtoCugKYYnaHR0cDovL2NybC5jbG91ZGZsYXJl
LmNvbS9vcmlnaW5fY2EuY3JsMA0GCSqGSIb3DQEBCwUAA4IBAQCiuYROX3X7Xp3I
uQ45WHKDTBNVONYtYfM0bjLYD5cguytmq76AB3ppq8lhk5r8uwQDew1UHN8DiTC0
fWiGu669pHM+szGX8bL9KIMFiMNcTJCORmB2HOvKM4/DA1UOxlAywrBP5XWfRZpx
bxjNOuwS8ZhQWjTaI6pKIRXX+JGAMlJHKCUQmD/Coaf81SRnk8NjfZ0F6rIxIG4i
TEFx0l5iJmiujl9GswCLUnsAYXkBV12O/NUv2PTRQtFU1k9m2q0iWTDJAIaJF+pK
SlPpR/dMBumfeQVdZhAsi89wUMYGonxofG64oE95Y3di/dLItfxzLykrTYOCN1tq
Ba10BoFN
-----END CERTIFICATE-----
Private Key
Copy the contents of your private key below to your web server and set file permissions such that only your http server can access it. Additionally, you can optionally encrypt this file and provide a password to decrypt it during your origin web server startup. The private key data will not be stored at Cloudflare and will no longer be accessible once the creation is complete. Please make sure you have a local copy of this key.
-----BEGIN PRIVATE KEY-----
MIIEvQIBADANBgkqhkiG9w0BAQEFAASCBKcwggSjAgEAAoIBAQDy+lHgRb+Fcy5Z
X08ju+hp932X6eGy7PZDnCDbq2PhJxJKJLRqghEon1+IXpz7h2LZjYUaDAz9T+cV
g6EWL+t5Rf3V3kGopS1h41ChmWk24eveS+L2gQAbWPHoP0exJDuNddSL5+c49Sra
rXBq5EA81VqlaEWeP2ci0qIolJX3AqrwuZAmK61B3vsc/XBYOe66nea/ihRIbFEE
bD2VRoN83D0G1biUaLs7r4cok8VkFPr0pOctlX/uKJY/YeVJE2qDClh5pfhT7PRr
z0YRUa+nVPt/ddeVW+fIHhwuUnpShWnobHaXBBPTxbsphs4myScL91BAVl5wUgJZ
bGP6AyFfAgMBAAECggEADpv/dUksUVVSGZyR8ReYy1pOqmYtJGl8CyelkB+3gy+q
uVuIn4jPiE5A2724maUTy/nm4WCNHWQDBHekJWXfNiz/rK7O6tl3p5WX4QeM3Hhs
CrMsY97wxzQrY2f+oweHLyPBEmJwtCuFlp1sD3lG5YF8kEp7OR8dz+mzR1Zbx/y6
lQJZrYuUcvJ2voHBDqeKt++eps71FDdmkL6LTAvQxueAHxZjVam9Eb7BT3XFdsC9
fWTMUTrhBtMrCiHYWW9cZKHrimYKRuubE/0yvWoqqlgyGVjkN4KX/Ls4lDeUdP/E
IvHCPwtdpAlcFZsqILJwWvVpaia4vZhgwetg++IW0QKBgQD8Xexzm2R6KvBUbA/5
ZqbbJjCRDtWeoSNTPY4eU73m3zq/Spg8KUMPaBWnIu5OEhWUcAZFkusiGzYEU6VA
u7031RUM/YqTSYFMliJh0bP/6uj7r1jrx83p3lt8RKrbbGJZD3PMVo0BhwmoR9a9
zaDIqdb0xdQ5Nhq0pd81dP9FMQKBgQD2ecsmfR5R4cNOXwmflgfL/QBAIEcQQxu5
U0kN1tGtjsSakx2oVR5pj9pAzteHErUH2nQ6HGP9wgsrKDISGYU+qo9BASckZtfC
f0jcaafAROzdHjxUA/GeMlBtFJ6k3ulE+Cl5koKn7HRX0CnDX0KcmGNxf4B+7OX5
peZSZYBrjwKBgA19O7lGMg2xo9zvVb8/9GU8WlY2k8aB2HCHlsQaN8lSX0KASzjT
/8igCKBBZrl3j/26Kyum2bid+borembGYivM0O470x9iS237jGTsH5HrTX6+daNM
r73za7JtvTAzT+JwyADBE5JkVGjRRjIo/pIbOekldd2E/dJwF0k1MrvRAoGAAvxy
w6KcbW2IyjhIi5Brw8Lq79v0QHQvr80cg3hozet+4kiKAXIWjjzZ7hMTdWV6n/+7
jMCvTXG+ZOV1xdZdUOcMGUOET+KXFpooLdNx3th27i7hmDr8AGinpMqtKV4yAU3o
Yrqtro8k0bOJ7f4HdpI6EjPzQJZqKt4hrjnglm0CgYEAu0QLr0aCBl8yDIvYBsKr
lsuaK2eHpKLIE1PXWbqS9k1j3s3KRYlz2JIUbpmID/kKe15pnK7yDLpCioYalmvX
qvXmRR7Q26yCrMDJuL34BDJbQTn2J8bEplkeMZE+xRzwr6NoASE0vZ3fgKLOnNr3
EKLMO4OPw4JFR+2kz518zss=
-----END PRIVATE KEY-----
Web Server for Installation
For installation instructions specific to your type of origin web server, visit our support guide on managing Origin CA certificates.
Snipe IT
- Installasi dan manajemen aset TIK menggunakan Snipe IT
Installasi Snipe IT Manajemen Asset TIK pada Ubuntu 22
Sebelum mencoba untuk menginstall Snipe IT, periksa terlebih dahulu apakah pada server sudah terinstall Apache, PHP 8, dan MySql, Cara Install Dapat Di Lihat Disini
PRE-REQUISITE
php -v
sudo systemctl status apache2
check MySQL berjalan pada server:
sudo systemctl status mysql
gunakan ctrl + x untuk keluar dari command mysql
INSTALLASI
sudo apt update && sudo apt upgrade -yInstall Package dan PHP extension yang diperlukan oleh Snipe IT
sudo apt install -y openssl curl git wget zip vim php-opcache php-pdo php-bcmath php-calendar php-ctype php-fileinfo php-ftp php-gd php-intl php-json php-ldap php-mbstring php-mysqli php-posix php-readline php-sockets php-bz2 php-tokenizer php-zip php-curl php-iconv php-pharcheck IP lokal pada server dengan command: ifconfig jika net-tools ada terinstall pada server atau gunakan command ip a

download dan install composer dengan command
sudo curl -sS https://getcomposer.org/installer | phpjika selesai download akan ada prompt bahwa composer berhasil di install

check apakah sudah terinstall dengan command ls atau ll

pindahkan file tadi menuju directory /usr/local/bin/composer
sudo mv composer.phar /usr/local/bin/composerperiksa lagi menggunakan ls /usr/local/bin/

BUAT DATABASE
buat database dengan login ke MySql dengan command
sudo mysql -uroot -pmasukan password MySql yang sudah kita buat saat installasi LAMP

Pakai Perintah Di Bawah untuk membuat database, Ganti tulisan berwarna merah dengan data sesuai yang diinginkan
CREATE DATABASE NamaDatabase;
CREATE USER UserDatabase@localhost IDENTIFIED BY 'PasswordDatabase';
GRANT ALL ON NamaDatabase.* to UserDatabase@localhost;
FLUSH PRIVILEGES;
lalu exit dengan mengetik exit;
masuk ke directory /var/www/html dengan command cd
cd /var/www/htmlcheck jika sudah masuk menggunakan command pwd atau ls lalu download versi terbaru dari Snipe IT
sudo git clone https://github.com/snipe/snipe-it snipe-itperiksan dengan ls jika file sudah terdownload

lalu masuk kedalam file directory yang sudah terdownload tadi menggunakan
cd snipe-itcopy file .env.example ke .env dengan command
cp .env.example .envsetelah itu cari file .env dengan command ls -a
edit file .env tersebut dengan menggunakan nano
sudo nano .env
ganti APP_URl=null dengan domain atau dengan ip lokal dari server contoh http://tik,murungrayakab.go.id atau http://172.000.000.000
ganti APP_TIMEZONE='UTC' dengan zona waktu indonesia APP_TIMEZONE='Asia/Jakarta'
ganti konfigurasi database dengan database yang baru kita buat tadi

gunakan ctrl+o untuk save dan enter, lalu tekan ctrl+x untuk keluar dari nano
INSTALL COMPOSER
sudo composer update --no-plugins --no-scriptsketik yes untuk konfirmasi

sudo composer install --no-dev --prefer-source --no-plugins --no-scriptsketik yes untuk konfirmasi

sudo php artisan key:generate
tekan tab untuk mengubah pilihan dari No menjadi Yes, lalu tekan enter

mundur satu directory dari folder dimana kita berada sekarang cd ..
lalu ubah perrmision dari folder html dengan menggunakan command
sudo chown -R www-data:www-data snipe-it/sudo chmod -R 755 snipe-it/gunakan command ll untuk mengecek permission dari folder yang sudah kita rubah

konfigurasi virtual host apache dengan command
sudo nano /etc/apache2/sites-available/tik.murungrayakab.go.id.conftambahkan script dibawah untuk referensi
<VirtualHost *:80>
ServerName localhost
DocumentRoot /var/www/html/snipe-it/public
<Directory /var/www/html/snipe-it/public>
Options Indexes FollowSymLinks MultiViews
AllowOverride All
Order allow,deny
Allow from all
</Directory>
</VirtualHost>
ketik ctrl+o lalu enter untuk save, dan ctrl+x untuk keluar
aktifkan virtualhost yang sudah dibuat tadi dengan command:
sudo a2ensite tik.murungrayakab.go.id.confmatikan default config apache dengan command
sudo a2dissite 000-default.confmengaktifkan modul rewrite di Apache pada sistem. Modul rewrite ini penting untuk membuat aturan URL yang dinamis dan mengelola URL redirection.
sudo a2enmod rewritelalu restart apache
sudo systemctl reload apache2jika ingin menggunakan reverse proxy dan subdomain
pastikan sudah mengganti APP_TRUSTED_PROXIES dengan IP reverse LOKAL/PUBLIK pada file .env

PROXMOX
Menambahkan User Untuk Container Proxmox
Memasukan User Baru Untuk Container Yang Baru Dibuat Agar Bisa Diakses Menggunakan SSH Dari Komputer Lain
User Root dari container secara default tidak dapat digunakan untuk remote, harus ada konfigurasi terlebih dahulu
Best Practice nya adalah, menambahkan user baru dan menambahkan user baru tersebut kedalam group sudo
Langkah 1. Menambahkan User Baru
tambahkan user menggunakan command
ganti tulisan merah dengan user yang ingin di isi
adduser [nama user]
contoh:
adduser egovtlalu masukan password dan keterangan lain dan konfirmasi menggunakan enter
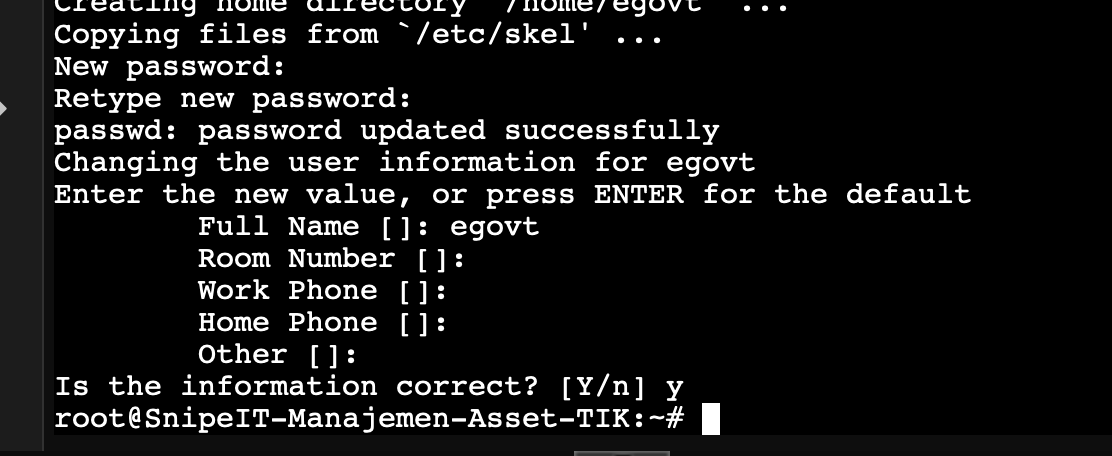
Langkah 2. Memasukan User Baru Ke Group Sudo
usermod -aG sudo [nama user]
contoh:
usermod -aG sudo egovtsetelah ini baru kita dapat melakukan SSH ke server yang berupa container
akses menggunakan user baru tadi ke IP server untuk memastikan dapat melakukan SSH
OsTicket
Cara Install OsTicket di Ubuntu 22
How to Install osTicket on Ubuntu 22.04
osTicket is an open-source software for ticketing systems. It is written in PHP and the data can be stored in MySQL or PostgreSQL database. osTicket offers a variety of features such as Ticket Filters, Service Level Agreements, Queues, Advanced Search, etc. In this blog post, we are going to use the LAMP stack for our osTicket system. In this tutorial, we are going to explain in detail how to install osTicket on Ubuntu 22.04.
Installing osTicket with the LAMP stack on Ubuntu 22.04 is straightforward, and the process will take up to 15 minutes. Let’s get things done!
Prerequisites
- A server running Ubuntu 22.04 or an Above
- User privileges: root or non-root user with sudo privileges
Step 1. Update the System
Since we have a fresh installation of Ubuntu 22.04, we need to update the packages to the latest versions available:
sudo apt update -y && sudo apt upgrade -y
Step 2. Install LAMP Stack
First part of installing the LAMP stack will be the Apache web server. To install it, execute the following command:
sudo apt install apache2 -y
Once installed, start and enable the service.
sudo systemctl enable apache2 && sudo systemctl start apache2
Check if the service is up and running:
sudo systemctl status apache2
You should receive the following output:
root@host:~# sudo systemctl status apache2
● apache2.service - The Apache HTTP Server
     Loaded: loaded (/lib/systemd/system/apache2.service; enabled; vendor preset: enabled)
     Active: active (running) since Fri 2023-10-19 04:50:18 CDT; 1s ago
       Docs: https://httpd.apache.org/docs/2.4/
    Process: 50686 ExecStart=/usr/sbin/apachectl start (code=exited, status=0/SUCCESS)
   Main PID: 50690 (apache2)
      Tasks: 6 (limit: 4558)
     Memory: 10.0M
        CPU: 203ms
     CGroup: /system.slice/apache2.service
Next is PHP with its extensions. To install PHP 8.1 completely, execute the following command:
sudo apt-get install php8.1 php8.1-cli php8.1-common php8.1-imap php8.1-redis php8.1-snmp php8.1-xml php8.1-zip php8.1-mbstring php8.1-curl php8.1-mysqli php8.1-gd php8.1-intl php8.1-apcu libapache2-mod-php -y
To check the installed PHP version, execute the following command, php -v:
root@host:~# php -v
Created directory: /var/lib/snmp/cert_indexes
PHP 8.1.2-1ubuntu2.14 (cli) (built: Aug 18 2023 11:41:11) (NTS)
Copyright (c) The PHP Group
Zend Engine v4.1.2, Copyright (c) Zend Technologies
    with Zend OPcache v8.1.2-1ubuntu2.14, Copyright (c), by Zend Technologies
The last component of the LAMP stack is the MariaDB (or MySQL) database server. To install the MariaDB database server, execute the command below.
sudo apt install mariadb-server -y
Start and enable the mariadb.service with the following commands:
sudo systemctl start mariadb && sudo systemctl enable mariadb
Check the status of the mariadb.service
sudo systemctl status mariadb
You should receive the following output:
root@host:~# sudo systemctl status mariadb
● mariadb.service - MariaDB 10.6.12 database server
     Loaded: loaded (/lib/systemd/system/mariadb.service; enabled; vendor preset: enabled)
     Active: active (running) since Fri 2023-10-19 04:58:18 CDT; 22s ago
       Docs: man:mariadbd(8)
             https://mariadb.com/kb/en/library/systemd/
   Main PID: 55172 (mariadbd)
     Status: "Taking your SQL requests now..."
      Tasks: 15 (limit: 4558)
     Memory: 61.2M
        CPU: 1.921s
     CGroup: /system.slice/mariadb.service
             └─55172 /usr/sbin/mariadbd
Step 3. Create osTicket database and database user
Next is to create the MariaDB database, the database user and grant permissions to that user for access to our osTicket database. Log in to the MariaDB console and execute the commands below:
CREATE DATABASE osticket;
GRANT ALL PRIVILEGES ON osticket.* TO osticket@localhost IDENTIFIED BY "YourStrongPasswordHere";
FLUSH PRIVILEGES;
EXIT;
Make sure to replace YourStrongPasswordHere with your own strong password. Make sure to note which password you used; you’ll need it later.
Step 4. Install osTicket on Ubuntu 22.04
First, we need to download the latest osTicket version into our Apache web document root.
cd /var/www/html

curl -s https://api.github.com/repos/osTicket/osTicket/releases/latest | grep browser_download_url | cut -d '"' -f 4 | wget -i -
Unzip the file and copy the configuration:
unzip osTicket-v1.18.zip -d osTicket

cp /var/www/html/osTicket/upload/include/ost-sampleconfig.php /var/www/html/osTicket/upload/include/ost-config.php

rm osTicket-v1.18.zip
Set the right permissions to files and folders.
chown -R www-data:www-data /var/www/html/osTicket/

find . -type d -exec chmod 755 {} \;

find . -type f -exec chmod 644 {} \;
Step 5. Create Apache Virtual Host File
Go into the Apache directory and create a configuration file for osTicket.
cd /etc/apache2/sites-available/

touch osticket.conf
Open the file, paste the following lines of code, save the file and close it.
<VirtualHost *:80>
ServerName yourdomain.com
DocumentRoot /var/www/html/osTicket/upload

<Directory /var/www/html/osTicket>
AllowOverride All
</Directory>

ErrorLog ${APACHE_LOG_DIR}/error.log
CustomLog ${APACHE_LOG_DIR}/access.log combined

</VirtualHost>
Enable the Apache configuration for osTicket and enable the Apache rewrite module.
sudo a2enmod rewrite

sudo a2ensite osticket.conf
Use this command to check your syntax for any errors:
apachectl -t
You should receive the following output:
root@vps:~# apachectl -t
Syntax OK
If the syntax is OK, you can restart the Apache service.
systemctl reload apache2
Once the Apache service is restarted, you can finish the osTicket installation at http://yourdomain.com. You must set a Name, Email, Username, and a strong password for your ticketing system. Also, you will be asked for the database credentials you set in step three during the installation. Congrats! You can now start using osTicket.
Installasi osTicket dari How To Forge
How to Install osTicket on Ubuntu 22.04
On this page
osTicket is an open-source and one of the most widely used ticketing systems by small and medium-sized businesses. It is a simple and easy-to-use web-based customer support portal that helps you to manage and track all tickets. osTicket allows you to define ticket routing rules to send tickets to the correct person. You can customize and add your logo, images, and videos to tickets. osTicket supports many database types, such as MySQL and PostgreSQL, and can be integrated with LDAP/Active directory for central authentication.
This post will explain how to install osTicket with Apache on Ubuntu 22.04.
Prerequisites
- A server running Ubuntu 22.04.
- A valid domain name is pointed to your server IP.
- A root password is configured on the server.
Install Apache, MariaDB, and PHP
First, you will need to install the Apache web server, MariaDB, PHP, and other PHP extensions to your server. You can install all the packages using the following command.
apt install apache2 mariadb-server php libapache2-mod-php php-mysql php-cgi php-fpm php-cli php-curl php-gd php-imap php-mbstring php-pear php-intl php-apcu php-common php-bcmath -yOnce all the packages are installed, start and enable the Apache and MariaDB service using the following command.
systemctl start apache2
systemctl enable apache2
systemctl start mariadb
systemctl enable mariadb
Create a Database for osTicket
First, secure the MariaDB installation with the following command.
mysql_secure_installation
Answer all the questions to set a MariaDB root password and secure the installation:
Enter current password for root (enter for none):
OK, successfully used password, moving on...

Set root password? [Y/n] Y
New password:
Re-enter new password:
Password updated successfully!

Remove anonymous users? [Y/n] Y
Disallow root login remotely? [Y/n] Y
Remove test database and access to it? [Y/n] Y
Reload privilege tables now? [Y/n] Y
Next, log in to the MariaDB shell with the following command.
mysql -u root -p
Once logged in, create a database and user for osTicket with the following command.
MariaDB [(none)]> CREATE DATABASE osticket;
MariaDB [(none)]> CREATE USER 'osticket'@'localhost' IDENTIFIED BY 'securepassword';
Next, grant all the privileges to the osTicket database with the following command.
MariaDB [(none)]> GRANT ALL PRIVILEGES ON osticket.* TO osticket@localhost IDENTIFIED BY "securepassword";
Next, flush the privileges and exit from the MariaDB shell with the following command.
MariaDB [(none)]> FLUSH PRIVILEGES;
MariaDB [(none)]> EXIT;
Once you are done, you can proceed to the next step.
Download osTicket
First, download the latest version of osTicket with the following command.
wget https://github.com/osTicket/osTicket/releases/download/v1.17.2/osTicket-v1.17.2.zip
Once the osTicket is downloaded, create a directory of osTicket and extract the downloaded file inside that directory.
mkdir /var/www/html/osticket
unzip osTicket-v1.17.2.zip -d /var/www/html/osticket
Next, change the ownership and permission of the osTicket directory with the following command:
chown -R www-data:www-data /var/www/html/osticket
chmod -R 755 /var/www/html/osticket
Now, rename the osTicket sample configuration file using the command given below:
mv /var/www/html/osticket/upload/include/ost-sampleconfig.php /var/www/html/osticket/upload/include/ost-config.php
Once you are finished, you can proceed to the next step.
Create Apache Virtual Host
Next, you will need to create an Apache virtual host configuration file for osTicket. You can create it with the following command.
nano /etc/apache2/sites-available/osticket.conf
Add the following lines:
<VirtualHost *:80>
        ServerName osticket.example.com
        ServerAdmin admin@localhost
        DocumentRoot /var/www/html/osticket/upload

        <Directory /var/www/html/osticket/upload>
                Require all granted
                Options FollowSymlinks
                AllowOverride All
        </Directory>

        ErrorLog ${APACHE_LOG_DIR}/osticket.error.log
        CustomLog ${APACHE_LOG_DIR}/osticket.access.log combined
</VirtualHost>
Save and close the file when you are done. Then, activate the osTicket virtual host and enable the Apache rewrite module with the following command:
a2ensite osticket.conf
a2enmod rewrite
Next, restart the Apache service to apply the configuration changes:
systemctl restart apache2
You can check the Apache status with the following command.
systemctl status apache2
You should get the following output.
? apache2.service - The Apache HTTP Server
     Loaded: loaded (/lib/systemd/system/apache2.service; enabled; vendor preset: enabled)
     Active: active (running) since Wed 2022-12-21 07:20:15 UTC; 3s ago
       Docs: https://httpd.apache.org/docs/2.4/
    Process: 62019 ExecStart=/usr/sbin/apachectl start (code=exited, status=0/SUCCESS)
   Main PID: 62023 (apache2)
      Tasks: 6 (limit: 2238)
     Memory: 15.4M
        CPU: 42ms
     CGroup: /system.slice/apache2.service
             ??62023 /usr/sbin/apache2 -k start
             ??62024 /usr/sbin/apache2 -k start
             ??62025 /usr/sbin/apache2 -k start
             ??62026 /usr/sbin/apache2 -k start
             ??62027 /usr/sbin/apache2 -k start
             ??62028 /usr/sbin/apache2 -k start

Dec 21 07:20:15 ubuntu2204 systemd[1]: apache2.service: Deactivated successfully.
Dec 21 07:20:15 ubuntu2204 systemd[1]: Stopped The Apache HTTP Server.
Dec 21 07:20:15 ubuntu2204 systemd[1]: Starting The Apache HTTP Server...
Launch osTicket Installation Wizard
You can now launch the osTicket installation wizard using the URL http://osticket.example.com. You should see the following page.
Click on the Continue. You should see the basic installation page.
Define your helpdesk URL, name, email, database name, username, password, then click on the Install Now button to start the installation. Once the osTicket is installed, you should see the following page.
To access the osTicket control panel, type the URL http://osticket.example.com/scp in your web browser. You should see the osTicket login page.
Provide your admin username, password and click on the Login button. You should see the osTicket dashboard on the following screen.You can also access the osTicket default page using the URL http://osticket.example.com
Secure osTicket with Let's Encrypt SSL
To secure your website with the Let's Encrypt SSL, you will need to install the certbot package on your server.
First, install the Snap package manager with the following command:
apt install snapd
Next, update the Snap package to the latest version:
snap install core
snap refresh core
Next, install the certbot package using the following command:
snap install --classic certbot
Next, create a symbolic link for Certbot binary to the system location:
ln -s /snap/bin/certbot /usr/bin/certbot
Next, run the following command to download and install Let's Encrypt SSL certificates:
certbot --apache -d osticket.example.com
You will be asked to provide your email address and accept the term of service:
Saving debug log to /var/log/letsencrypt/letsencrypt.log
Enter email address (used for urgent renewal and security notices)
 (Enter 'c' to cancel): hitjethva@gmail.com

- - - - - - - - - - - - - - - - - - - - - - - - - - - - - - - - - - - - - - - -
Please read the Terms of Service at
https://letsencrypt.org/documents/LE-SA-v1.3-September-21-2022.pdf. You must
agree in order to register with the ACME server. Do you agree?
- - - - - - - - - - - - - - - - - - - - - - - - - - - - - - - - - - - - - - - -
(Y)es/(N)o: Y

- - - - - - - - - - - - - - - - - - - - - - - - - - - - - - - - - - - - - - - -
Would you be willing, once your first certificate is successfully issued, to
share your email address with the Electronic Frontier Foundation, a founding
partner of the Let's Encrypt project and the non-profit organization that
develops Certbot? We'd like to send you email about our work encrypting the web,
EFF news, campaigns, and ways to support digital freedom.
- - - - - - - - - - - - - - - - - - - - - - - - - - - - - - - - - - - - - - - -
(Y)es/(N)o: Y
Type Y and press the Enter key to download and install the SSL certificates for your domain:
Account registered.
Requesting a certificate for osticket.example.com

Successfully received certificate.
Certificate is saved at: /etc/letsencrypt/live/osticket.example.com/fullchain.pem
Key is saved at:         /etc/letsencrypt/live/osticket.example.com/privkey.pem
This certificate expires on 2023-03-22.
These files will be updated when the certificate renews.
Certbot has set up a scheduled task to automatically renew this certificate in the background.

Deploying certificate
Successfully deployed certificate for osticket.example.com to /etc/apache2/sites-enable/osticket.conf
Congratulations! You have successfully enabled HTTPS on https://osticket.example.com

- - - - - - - - - - - - - - - - - - - - - - - - - - - - - - - - - - - - - - - -
If you like Certbot, please consider supporting our work by:
 * Donating to ISRG / Let's Encrypt:   https://letsencrypt.org/donate
 * Donating to EFF:                    https://eff.org/donate-le
- - - - - - - - - - - - - - - - - - - - - - - - - - - - - - - - - - - - - - - -
Conclusion
In this post, we showed you how to install osTicket with Apache on Ubuntu 22.04 server. You can now deploy osTicket in your organization to scale and streamline your customer service and drastically improve your customer experience.